본 글은 원문 링크 에서 제공하는 예제 코드를 기반으로 작성된 글입니다.
개요
AI 시스템을 설계하다 보면 한 가지 확실한 사실이 있습니다. 바로 패턴이 모든 것을 결정한다는 점입니다.
전통적인 소프트웨어든, LLM 기반의 에이전트든, 워크플로우를 어떻게 구조화하느냐가 시스템의 견고함, 유연성, 확장성을 좌우합니다.
이때 LangGraph는 복잡한 커스텀 로직 대신, 그래프 기반의 프레임워크를 통해 워크플로우를 정의·시각화·디버깅할 수 있도록 도와줍니다.
즉, 에이전트 간의 관계를 그래프로 표현하여, 데이터의 흐름을 한눈에 파악하고 문제를 쉽게 수정할 수 있게 해줍니다.
이번 글에서는 LangGraph를 활용해 구현할 수 있는 대표적인 에이전트 디자인 패턴들을 정리해보겠습니다.
각 패턴이 왜 중요한지, 어떤 상황에서 유용한지, 그리고 실제 시스템에서는 어떻게 활용되는지에 초점을 맞췄습니다.
요약
AI 에이전트 개발은 여전히 빠르게 변화하는 초기 분야입니다. 그만큼 아키텍처를 잘 설계하지 않으면 유지보수와 확장이 어렵습니다.
LangGraph는 이러한 문제를 해결하기 위한 다양한 검증된 디자인 패턴을 제공합니다.
이번 글에서 다룰 주요 패턴은 다음과 같습니다.
- Prompt Chaining — 복잡한 작업을 단계별로 분리하여 처리
- Routing & Parallelization — 입력에 따라 분기하거나 여러 작업을 동시에 수행
- Reflection — 에이전트가 자신의 출력을 평가하고 개선
- Tool Use — 외부 API나 시스템과 연동하여 기능 확장
- Planning — 목표를 명확한 실행 순서로 구조화
- Multi-Agent Collaboration — 여러 전문 에이전트를 협력시켜 복잡한 문제 해결
*예제에서는 LangChain을 통해 openai API를 사용할 예정입니다.
import os
import operator
from typing import Annotated, Literal
from typing_extensions import TypedDict
from pydantic import BaseModel
from langgraph.graph import StateGraph, MessagesState, START, END
from langgraph.prebuilt import ToolNode
from langgraph.graph.message import add_messages
from langgraph.types import Command
from langchain.chat_models import ChatOpenAI
from langchain.chat_models import init_chat_model
from langchain_core.messages import AnyMessage, HumanMessage

os.environ["OPENAI_API_KEY"] = "Your API KEY"

OPENAI_API_KEY = os.getenv("OPENAI_API_KEY")
프롬프트 체이닝 (Prompt Chaining)
프롬프트 체이닝은 가장 기본적이면서도 강력한 패턴입니다. 한 모델의 출력이 다음 모델의 입력이 되는 구조로, 단계별로 작업을 정제해 나갑니다.
마치 릴레이 경주처럼, 각 노드가 결과를 다음 노드로 넘기며 품질을 높여갑니다. 예를 들어 다음과 같은 과정을 생각해볼 수 있습니다.
- 입력 텍스트에서 핵심 주제를 추출
- 추출된 주제를 바탕으로 블로그 제목 생성
이 패턴을 LangGraph에서 구현하면, 각 단계가 독립적인 노드로 구성되고,
노드 간 연결을 통해 자연스러운 정보 흐름을 만들 수 있습니다.
결과적으로 명확하고 추적 가능한 데이터 파이프라인을 구축할 수 있습니다.
# Define LLM client
llm = ChatOpenAI(
    model="gpt-5-nano",
    api_key=OPENAI_API_KEY
)

system_prompt = "You are an expert technical writer. Always give clear, concise, and straight-to-the-point answers."

# Define the graph state
class State(dict):
    text: str
    topics: str
    title: str

# Define nodes (steps)
def extract_topics(state: State) -> State:
    prompt = f"Extract 1-3 key topics from the following text:\n\n{state['text']}"

    messages = [
    (
        "system",
        system_prompt,
    ),
    ("human", prompt),
    ]
    resp = llm.invoke(messages)
    state["topics"] = resp.content.strip()
    return state

def generate_title(state: State) -> State:
    prompt = f"Generate two catchy blog titles for each one these topics:\n\n{state['topics']}"
    resp = llm.invoke(prompt)
    state["title"] = resp.content.strip()
    return state

# Build the graph
workflow = StateGraph(State)
workflow.add_node("extract_topics", extract_topics)
workflow.add_node("generate_title", generate_title)

# Flow: extract_topics → generate_title → END
workflow.set_entry_point("extract_topics")
workflow.add_edge("extract_topics", "generate_title")
workflow.add_edge("generate_title", END)

# Compile runnable graph
graph = workflow.compile()워크플로우를 순서도로 나타내면 다음과 같습니다.

워크플로우가 정의되었으므로, 이제 그래프를 실행할 수 있습니다.
여기서는 LangGraph에 대한 짧은 텍스트를 제공하고, 그래프는 순차적으로 주제를 추출하고 제안된 블로그 제목을 생성합니다.
# Run the graph
input_text = (
    "LangGraph는 LLM 기반 에이전트 구축을 위한 그래프 기반 패러다임을 제시합니다."
    "개발자는 노드, 엣지, 상태 전달을 사용하여 모듈화되고 디버깅 가능하며 신뢰할 수 있는 에이전트 워크플로우를 생성할 수 있습니다."
)

result = graph.invoke({"text": input_text})
print("Topics:", result["topics"])
print("\n"+"="*50+"\n")
print("Suggested Blog Title:", result["title"])출력:
Topics:
- 그래프 기반 패러다임으로 LLM 기반 에이전트 구축
- 모듈화, 디버깅 가능, 신뢰할 수 있는 에이전트 워크플로우
- 노드, 엣지, 상태 전달을 통한 구성 및 흐름 제어

==================================================

Suggested Blog Title:
- 그래프 기반 패러다임으로 LLM 기반 에이전트 구축
  - 그래프가 이끄는 사고: LLM 에이전트 구축의 새로운 패러다임
  - 노드와 간선으로 설계하는 똑똑한 LLM 에이전트: 그래프 기반 패러다임의 힘

- 모듈화, 디버깅 가능, 신뢰할 수 있는 에이전트 워크플로우
  - 모듈화로 신뢰를 쌓다: 디버깅 가능한 에이전트 워크플로우의 미래
  - 버그 없는 흐름, 믿을 수 있는 자동화: 모듈화와 디버깅으로 만드는 워크플로우

- 노드, 엣지, 상태 전달을 통한 구성 및 흐름 제어
  - 노드-엣지-상태로 여는 흐름 제어의 설계도
  - 구성의 지도, 흐름의 기술: 노드와 엣지, 상태 전달로 제어하기
라우팅 (Routing)
모든 입력이 동일한 처리를 거칠 필요는 없습니다. 라우팅은 입력을 분류해 적절한 분기(branch)로 보내는 패턴입니다.
예를 들어,
- 긍정적인 감정 → 격려 메시지 생성
- 부정적인 감정 → 위로 메시지 생성
이처럼 조건에 따라 다른 노드로 데이터를 보낼 수 있습니다.
LangGraph는 조건부 엣지(conditional edge)를 통해 이러한 분기 로직을 시각적으로 명확하게 구성할 수 있도록 지원합니다.
덕분에 워크플로우의 가독성과 유지보수성이 높아지고, 복잡한 조건 분기를 간결하게 관리할 수 있습니다.
이 예제에서 classification 노드는 먼저 텍스트의 감정을 분류하고 상태를 업데이트합니다.
그런 다음, 조건부 엣지(conditional edge) 함수 router_func가 positive 또는 negative 중 어느 branch를 따를지 결정합니다.
각 branch는 해당 감정에 맞는 응답을 생성합니다.
# Define LLM client
llm = ChatOpenAI(
    model="gpt-5-nano",
    api_key=OPENAI_API_KEY
)

SYSTEM_PROMPT = "You are a helpful assistant that can classify text sentiment and respond accordingly."

def invoke_with_system(prompt: str):
    """모든 호출에 system prompt를 자동으로 포함"""
    messages = [
        SystemMessage(content=SYSTEM_PROMPT),
        HumanMessage(content=prompt)
    ]
    return llm.invoke(messages)

# State definition
class State(dict):
    text: str
    sentiment: str
    response: str

# Nodes
def calssification(state: State) -> str:
    """Classify sentiment."""
    prompt = f"Is the following text positive or negative? Answer with one word only: Positive or Negative.\n\n{state['text']}"
    resp = invoke_with_system(prompt)
    sentiment = resp.content.strip().lower()
    state["sentiment"] = sentiment
    return state

def positive_node(state: State) -> State:
    prompt = f"Generate an encouraging reply to this positive text:\n\n{state['text']}"
    resp = invoke_with_system(prompt)
    state["response"] = resp.content.strip()
    return state

def negative_node(state: State) -> State:
    prompt = f"Generate a supportive reply to this negative text:\n\n{state['text']}"
    resp = invoke_with_system(prompt)
    state["response"] = resp.content.strip()
    return state

def router_func(state: State) -> Literal["positive", "negative"]:
    """Return next node name."""
    return "positive" if "positive" in state["sentiment"] else "negative"

# Build the graph
workflow = StateGraph(State)

workflow.add_node("calssification", calssification)
workflow.add_node("positive", positive_node)
workflow.add_node("negative", negative_node)

# classify node decides the next step
workflow.set_entry_point("calssification")
workflow.add_conditional_edges("calssification", router_func, {
    "positive": "positive",
    "negative": "negative",
})

# Both branches lead to END
workflow.add_edge("positive", END)
workflow.add_edge("negative", END)

graph = workflow.compile()에이전트 워크플로우 차트:

라우팅 워크플로우가 정의되었으므로, 샘플 입력으로 테스트할 수 있습니다. 여기서는 에이전트가 긍정적인 메시지의 감정을 평가하고 적절한 응답을 생성합니다.
# Run example
input_text = "제 프로젝트 결과가 정말 마음에 들어요!"
result = graph.invoke({"text": input_text})
print("Sentiment:", result["sentiment"])
print("Response:", result["response"])출력:
Sentiment: positive
Response: 정말 멋져요! 프로젝트 결과가 마음에 들다니 당신의 노력과 열정이 빛난 순간이에요. 앞으로도 계속 힘내서 더 큰 성과를 이루길 응원합니다. 필요하면 언제든 도와드릴게요!
Parallelization
여러 작업을 동시에 처리할 수 있다면 굳이 순차적으로 기다릴 이유가 없습니다.
Parallelization(병렬 처리) 패턴은 시간 효율성을 극대화하는 방법입니다.
예를 들어 하나의 입력 텍스트에 대해 다음 두 작업을 병렬로 실행할 수 있습니다.
- 요약(Summarization)
- 비평(Critique)
두 결과가 생성되면, 이를 합쳐 하나의 통합된 결과로 반환합니다.
LangGraph는 병렬 엣지와 상태 관리 기능을 제공해 각 노드가 독립적으로 실행되면서도 결과를 안정적으로 병합할 수 있게 해줍니다.
이 패턴은 특히 리서치 요약, 데이터 분석, 복합 응답 생성 등에 유용합니다.
# Define LLM client
llm = ChatOpenAI(
    model="gpt-5-nano",
    api_key=OPENAI_API_KEY
)

# State definition
class State(TypedDict):
    text: str
    # Reducer makes these append-only so multiple nodes can update in parallel
    outputs: Annotated[list, operator.add]

# Nodes
def summarize(state: State):
    prompt = f"Summarize in one sentence:\n\n{state['text']}"
    resp = llm.invoke(prompt)
    return {"outputs": [f"Summary: {resp.content.strip()}"]}

def critique(state: State):
    prompt = f"Critique briefly:\n\n{state['text']}"
    resp = llm.invoke(prompt)
    return {"outputs": [f"Critique: {resp.content.strip()}"]}

def combine(state: State):
    prompt = f"Combine the following Critique and Summarization in one \
    paragraph:\n\n{state['text']}"
    resp = llm.invoke(prompt)
    return {"outputs": [f"Combined:\n{resp.content.strip()}"]}

# Build the graph
builder = StateGraph(State)
builder.add_node("summarize", summarize)
builder.add_node("critique", critique)
builder.add_node("combine", combine)

# Parallel edges: summarize and critique run side by side
builder.add_edge(START, "summarize")
builder.add_edge(START, "critique")

# Both join into combine
builder.add_edge("summarize", "combine")
builder.add_edge("critique", "combine")

builder.add_edge("combine", END)

graph = builder.compile()
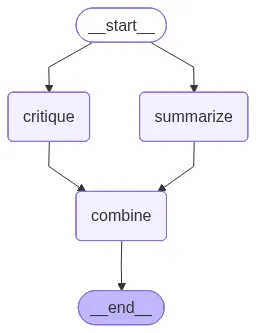
Parallelization 워크플로우가 준비되었으므로, 샘플 입력으로 워크플로우를 실행할 수 있습니다. 그래프는 summarize와 critique 노드를 동시에 실행한 다음, 그 결과를 단일 출력으로 결합합니다.
# --- Run example ---
input_text = "LangGraph는 개발자가 LLM을 활용한 에이전트 워크플로를 설계하고 실행할 수 있도록 지원합니다."
result = graph.invoke({"text": input_text, "outputs": []})

print("\nFinal outputs:")
for out in result["outputs"]:
    print(out)
print("="*100 + "\n")출력:
Final outputs:
Critique: 다음은 간략한 비판입니다.

장점
- LLM을 활용한 에이전트 워크플로를 설계하고 실행하는 흐름을 하나의 도구로 묶어 생산성을 높여 줍니다.
- 프롬프트 템플릿, 도구 어댑터, 워크플로 정의의 재사용성을 높여 일관성과 협업이 쉬워집니다.
- 실행 추적/버전 관리와 시각화가 가능하면 재현성과 협업이 개선됩니다.

단점/위험
- LLM의 비결정성, 편향, 비용/지연 등의 문제로 예측 가능성과 신뢰성에 제약이 생길 수 있습니다.
- 다중 에이전트 워크플로의 디버깅과 테스트가 복잡해지며 프롬프트 변경에 취약해질 수 있습니다.
- 도구 연동의 초기 설정, 보안(자격 증명 관리, 프롬프트 인젝션 방지) 및 권한 관리 이슈가 발생하기 쉽습니다.
- 대규모 워크플로의 확장성, 상태 관리, 롤백/재실행 정책 등 운영 측면이 도전적일 수 있습니다.

개선 제안
- 타입/스키마 기반의 프롬프트 템플릿과 입력/출력 명세를 강화하고, 자동화된 테스트 및 시나리오 실행 도구를 제공.
- 관찰성 강화: 트레이스, 메트릭, 로그, 상태 머신 기반의 디버깅과 안전한 롤백/재실행 기능 도입.
- 보안 및 거버넌스 강화: 비밀 관리, 최소 권한 원칙, 프롬프트 인젝션 방지 가드.
- 실행 환경의 유연성: 로컬/클라우드 멀티플랫폼 지원, 비용 관리 및 모니터링 도구의 내재화.

요약: 생산성은 높이되, 예측 가능성과 안전성을 확보하기 위한 관찰성, 테스트, 보안 강화를 함께 추진하는 것이 중요합니다.
====================================================================================================

Summary: LangGraph는 개발자가 LLM을 활용한 에이전트 워크플로를 설계하고 실행하도록 돕는 도구다.
====================================================================================================

Combined:
요약과 비평: LangGraph는 개발자가 LLM을 활용한 에이전트 워크플로를 설계하고 실행할 수 있도록 돕는다는 점에서 개발자 친화적 도구로 의도되어 있다. 그러나 이 한 문장만으로는 구체적인 기능 범위나 구현 방식, 보안, 확장성, 데이터 프라이버시, 실패 대응 등 핵심 운영 이슈에 대한 정보가 부족해 실제 적용 가능성이나 한계를 판단하기 어렵다. 따라서 사용자는 성능, 비용, 안정성, 생태계 연계성 등 추가 세부 정보를 확인해야 하며, 특정 시나리오에서의 사례나 실전 평가가 필요하다.
====================================================================================================
Reflection
에이전트가 단순히 답만 내놓는 시대는 끝났습니다.
이제는 자신의 출력을 평가하고 개선하는 능력, 즉 ‘reflection( 성찰 )’이 필요합니다.
Reflection 패턴의 핵심은 반복입니다. 에이전트가 초안을 만들고, 이를 평가하며, 필요할 경우 다시 수정하는 순환 구조를 갖습니다.
워크플로우 예시는 다음과 같습니다.
- 초안 생성 (
generator노드) - 검토 및 피드백 (
evaluator노드) - 수정 여부 결정 (
decide함수) - 최종 결과 저장 (
finalize노드)
LangGraph는 조건부 루프를 통해 이러한 반복 과정을 자연스럽게 표현할 수 있습니다.
이 방식은 모델의 품질 안정성을 높이고, 불완전한 초안이나 환각(hallucination)을 효과적으로 줄이는 데 도움이 됩니다.
# Define LLM client
llm = ChatOpenAI(
    model="gpt-5-nano",
    api_key=OPENAI_API_KEY
)

# State
class State(TypedDict):
    task: str
    draft: str
    feedback: str
    final: str

# Nodes
def generator(state: State):
    """Generate an initial or refined draft."""
    prompt = f"""
You are an assistant helping to complete the following task:

Task:
{state['task']}

Current Draft:
{state.get('draft', 'None')}

Feedback:
{state.get('feedback', 'None')}

Instructions:
- If there is no draft and no feedback, generate a clear and complete response to the task.
- If there is a draft but no feedback, improve the draft as needed for clarity and quality.
- If there is both a draft and feedback, revise the draft by incorporating the feedback directly.
- Always produce a single, improved draft as your output.
"""
    resp = llm.invoke(prompt)
    return {"draft": resp.content.strip()}

def evaluator(state: State):
    """Evaluate the draft and give feedback or approval."""
    prompt = f"""Evaluate the following draft, based on the given task.
If it meets the requirements, reply exactly 'APPROVED'.
Otherwise, provide constructive feedback for improvement.
Task:
{state['task']}
Draft:
{state['draft']}"""
    resp = llm.invoke(prompt)
    print(f"""
================= DRAFT =================
{state['draft']}

================ FEEDBACK ===============
{resp.content.strip()}
========================================
""")
    return {"feedback": resp.content.strip()}

def decide(state: State) -> str:
    """Decide next step: either approve and finish, or refine again."""
    if "APPROVED" in state["feedback"].upper():
        return "approved"
    return "refine"

def finalize(state: State):
    """Save the final approved draft."""
    return {"final": state["draft"]}

# Build the graph
builder = StateGraph(State)

builder.add_node("generator", generator)
builder.add_node("evaluator", evaluator)
builder.add_node("finalize", finalize)

builder.add_edge(START, "generator")
builder.add_edge("generator", "evaluator")
builder.add_edge("evaluator", "finalize")

# Conditional edges from decide
builder.add_conditional_edges(
    "evaluator",
    decide,
    {
        "approved": "finalize",   # stop loop
        "refine": "generator",    # go back for improvement
    },
)

builder.add_edge("finalize", END)

graph = builder.compile()Reflection 워크플로우 차트:

Reflection 워크플로우가 정의되었으므로, 샘플 작업으로 실행해 보겠습니다. 에이전트는 솔루션 초안을 생성하고, 평가하며, 출력이 승인될 때까지 필요에 따라 반복합니다.
# Run example
input_task = "당신은 여섯 마리의 말을 가지고 있으며, 어느 말이 가장 빠른지 경주하여 확인하고 싶습니다. 이를 확인하는 가장 좋은 방법은 무엇일까요?"
result = graph.invoke({"task": input_task})

print("\nFinal Answer:\n", result["final"])출력:
================= DRAFT =================
가장 간단하고 확실한 방법은 여섯 마리를 한 번에 같은 거리/조건으로 경주시키는 것입니다. 한 번의 경주 결과로 누가 가장 빠른지 결정됩니다. 다만 더 확실하게 보려면 타임 트라이얼을 추가하는 방법도 좋습니다.

권장 방법 1: 한 번의 경주로 fastest 결정 (가장 간단하고 일반적인 방법)
- 거리와 트랙 조건을 모두 동일하게 고정합니다(예: 400m 트랙, 같은 표면/길이).
- 모든 말은 같은 워밍업 시간과 준비로 시작합니다.
- 출발 위치를 무작위로 정하고, 표준화된 출발 방법으로 경기를 시작합니다.
- 타임키퍼나 전자 계측기로 정확한 시간을 측정하고, finish 순서를 기록합니다.
- 경주가 끝난 뒤 가장 먼저 결승선을 통과한 말이 가장 빠른 말입니다.
- 동점이 나오면 재경주로 동점을 해소합니다.

권장 방법 2: 더 확실하게 하려면 타임 트라이얼 병행
- 여섯 마리 각각이 독립적으로 같은 거리에서 차례대로 달리게 하여 정확한 시간을 측정합니다.
- 같은 조건(같은 트랙, 같은 거리, 같은 워밍업 시간)을 유지하고, 각 말의 시간을 기록합니다.
- 모든 말의 평균 시간이나 여러 차례의 평균 시간을 비교해 가장 작은 시간을 기록한 말이 fastest로 결정됩니다.
- 동점이 나면 추가 레이스로 해결합니다.
- 이 방법은 바람/트랙 상태 변화나 선두와 뒤따르는 차이로 인한 간섭을 줄일 수 있습니다.

추가 팁
- 가능하면 같은 날 같은 트랙에서 측정하는 것이 좋습니다.
- 바람, 트랙 마모, 날씨 등의 외부 요인을 최소화하려고 노력하세요.
- 말의 컨디션과 워밍업 시간을 최대한 표준화하고, 휴식 시간을 충분히 주어 피로가 속도에 영향을 주지 않도록 합니다.
- 필요한 경우, 결과를 시각적으로 비교할 수 있도록 표나 그래프로 기록해 두면 판단이 쉽습니다.

요약
- 가장 빠른 말을 확인하는 가장 좋은 방법은 기본적으로 한 번의 동시 경주로 판정하는 것인데, 더 확실하게 하려면 각 말의 개별 시간 기록(타임 트라이얼)을 병행하는 것이 좋습니다.

================ FEEDBACK ===============
APPROVED
========================================

Final Answer:
 가장 간단하고 확실한 방법은 여섯 마리를 한 번에 같은 거리/조건으로 경주시키는 것입니다. 한 번의 경주 결과로 누가 가장 빠른지 결정됩니다. 다만 더 확실하게 보려면 타임 트라이얼을 추가하는 방법도 좋습니다.

권장 방법 1: 한 번의 경주로 fastest 결정 (가장 간단하고 일반적인 방법)
- 거리와 트랙 조건을 모두 동일하게 고정합니다(예: 400m 트랙, 같은 표면/길이).
- 모든 말은 같은 워밍업 시간과 준비로 시작합니다.
- 출발 위치를 무작위로 정하고, 표준화된 출발 방법으로 경기를 시작합니다.
- 타임키퍼나 전자 계측기로 정확한 시간을 측정하고, finish 순서를 기록합니다.
- 경주가 끝난 뒤 가장 먼저 결승선을 통과한 말이 가장 빠른 말입니다.
- 동점이 나오면 재경주로 동점을 해소합니다.

권장 방법 2: 더 확실하게 하려면 타임 트라이얼 병행
- 여섯 마리 각각이 독립적으로 같은 거리에서 차례대로 달리게 하여 정확한 시간을 측정합니다.
- 같은 조건(같은 트랙, 같은 거리, 같은 워밍업 시간)을 유지하고, 각 말의 시간을 기록합니다.
- 모든 말의 평균 시간이나 여러 차례의 평균 시간을 비교해 가장 작은 시간을 기록한 말이 fastest로 결정됩니다.
- 동점이 나면 추가 레이스로 해결합니다.
- 이 방법은 바람/트랙 상태 변화나 선두와 뒤따르는 차이로 인한 간섭을 줄일 수 있습니다.

추가 팁
- 가능하면 같은 날 같은 트랙에서 측정하는 것이 좋습니다.
- 바람, 트랙 마모, 날씨 등의 외부 요인을 최소화하려고 노력하세요.
- 말의 컨디션과 워밍업 시간을 최대한 표준화하고, 휴식 시간을 충분히 주어 피로가 속도에 영향을 주지 않도록 합니다.
- 필요한 경우, 결과를 시각적으로 비교할 수 있도록 표나 그래프로 기록해 두면 판단이 쉽습니다.

요약
- 가장 빠른 말을 확인하는 가장 좋은 방법은 기본적으로 한 번의 동시 경주로 판정하는 것인데, 더 확실하게 하려면 각 말의 개별 시간 기록(타임 트라이얼)을 병행하는 것이 좋습니다.
도구 사용 (Tool Use)
LangGraph는 간단한 수학 연산부터 복잡한 외부 API 호출까지, 다양한 도구를 에이전트 워크플로우에 유연하게 통합할 수 있습니다.
이 패턴의 핵심은 LLM이 단순히 답변을 “생성”하는 것을 넘어, 필요할 때 외부 도구에 작업을 위임(delegate)한다는 점입니다.
즉, 모델을 텍스트 생성기에서 문제 해결형 시스템으로 발전시킬 수 있습니다.
예를 들어, LangGraph에서는 간단한 계산기 도구를 정의한 뒤 LLM에 연결(bind)할 수 있습니다.
워크플로우의 작동 방식은 다음과 같습니다.
- 사용자의 입력 메시지를 모델에 전달
- 모델이 특정 도구의 사용을 요청하는지 판단
- 요청이 있다면, 해당 도구를 실행하고 그 결과를 모델에 다시 전달
이 과정이 모델 노드와 도구 노드 사이에서 순환되면서, 에이전트는 단순한 텍스트 생성 단계를 넘어 외부 기능과의 동적 상호작용을 수행할 수 있습니다.
이를 통해 LLM은 보다 실행 가능한 지능적 시스템으로 확장됩니다.
# State definition
class State(TypedDict):
    messages: Annotated[list[AnyMessage], add_messages]

# Define a simple tool
def calculator(expression: str):
    """Evaluate a math expression."""
    try:
        return str(eval(expression))
    except Exception as e:
        return f"Error: {e}"

# Initialize gpt-5-nano model with tools
llm = ChatOpenAI(
    model="gpt-5-nano",
    api_key=OPENAI_API_KEY
)

model_with_tools = llm.bind_tools([calculator])
tool_node = ToolNode([calculator])

# Nodes
def call_model(state: State):
    """Call the model; it may request a tool."""
    messages = state["messages"]
    response = model_with_tools.invoke(messages)
    return {"messages": [response]}

def should_continue(state: State):
    """Decide whether to go to tools or finish."""
    messages = state["messages"]
    last_message = messages[-1]
    if last_message.tool_calls:  # If the model requested a tool
        return "tools"
    return END

# Build the graph
builder = StateGraph(State)

builder.add_node("call_model", call_model)
builder.add_node("tools", tool_node)

builder.add_edge(START, "call_model")
builder.add_conditional_edges("call_model", should_continue, ["tools", END])
builder.add_edge("tools", "call_model")

graph = builder.compile()도구 사용 순서도:

도구 사용이 가능한 워크플로우가 준비되었으므로, 샘플 쿼리를 실행할 수 있습니다. 모델은 계산이 필요함을 인식하고, calculator 도구를 호출하며, 대화 내에서 결과를 반환합니다.
# Run example
query = {"role": "user", "content": "12 * 7은 무엇인가요?"}
result = graph.invoke({"messages": [query]})

print("\nConversation:")
for m in result["messages"]:
print(m)출력:
Conversation:
content='What is 12 * 7?' additional_kwargs={} response_metadata={} id='5ceeda02-510d-4bad-849a-759212097013'content='' additional_kwargs={'function_call': {'name': 'calculator', 'arguments': '{"expression": "12 * 7"}'}} response_metadata={'prompt_feedback': {'block_reason': 0, 'safety_ratings': []}, 'finish_reason': 'STOP', 'safety_ratings': []} id='run--b8c8ab73-5082-47c0-9bd9-8e46b2ae3ad1-0' tool_calls=[{'name': 'calculator', 'args': {'expression': '12 * 7'}, 'id': '662e4855-57d9-4304-be72-923b453c8577', 'type': 'tool_call'}] usage_metadata={'input_tokens': 19, 'output_tokens': 7, 'total_tokens': 26, 'input_token_details': {'cache_read': 0}}
content='84' name='calculator' id='6354a43a-c65e-44b2-84b5-2a575a7b3cf2' tool_call_id='662e4855-57d9-4304-be72-923b453c8577'content='The answer is 84.' additional_kwargs={} response_metadata={'prompt_feedback': {'block_reason': 0, 'safety_ratings': []}, 'finish_reason': 'STOP', 'safety_ratings': []} id='run--dd0f2241-aab6-4412-bd78-c36a79038328-0' usage_metadata={'input_tokens': 29, 'output_tokens': 8, 'total_tokens': 37, 'input_token_details': {'cache_read': 0}}Conversation:
content='12 * 7은 무엇인가요?' additional_kwargs={} response_metadata={} id='224e90dc-c432-4530-b1c8-69777b722ba2'
content='12 곱하기 7은 84입니다.' additional_kwargs={'refusal': None} response_metadata={'token_usage': {'completion_tokens': 212, 'prompt_tokens': 131, 'total_tokens': 343, 'completion_tokens_details': {'accepted_prediction_tokens': 0, 'audio_tokens': 0, 'reasoning_tokens': 192, 'rejected_prediction_tokens': 0}, 'prompt_tokens_details': {'audio_tokens': 0, 'cached_tokens': 0}}, 'model_name': 'gpt-5-nano-2025-08-07', 'system_fingerprint': None, 'id': 'chatcmpl-CWNcnhKYh3PmaoUqXU1v4zqtDkpP1', 'service_tier': 'default', 'finish_reason': 'stop', 'logprobs': None} id='run--306e561d-dad0-43af-80c8-dc52ec77bcf2-0' usage_metadata={'input_tokens': 131, 'output_tokens': 212, 'total_tokens': 343, 'input_token_details': {'audio': 0, 'cache_read': 0}, 'output_token_details': {'audio': 0, 'reasoning': 192}}
Planning
라우팅이 입력에 따라 하나의 분기를 선택하는 구조라면, 플래닝(Planning)은 그보다 한 단계 더 나아가 다단계 로드맵을 설계하는 패턴입니다.
이 방식은 에이전트가 단순한 반응형 시스템이 아니라, “먼저 정보를 수집하고 → 분석한 뒤 → 결과를 종합하자”와 같이
체계적인 실행 계획을 세울 수 있는 능동적 시스템으로 동작하게 만듭니다.
플래닝 패턴은 특히 리서치 보조, 데이터 비교, 단계적 의사결정이 필요한 경우에 유용합니다.
이 패턴을 적용하면 에이전트가 작업 순서를 스스로 계획하고, 각 단계를 효율적으로 실행하며, 전체 프로세스를 전략적으로 관리할 수 있습니다.
# Set up the Language Model
llm = ChatOpenAI(
    model="gpt-5-nano",
    api_key=OPENAI_API_KEY
)

# Define the State
# We need separate fields for each worker's results.
class PlannerState(TypedDict):
    task: str
    plan: list[str]
    graphql_results: str  # Results from the GraphQL researcher
    rest_results: str     # Results from the REST researcher
    final_output: str     # The final written summary

# Define the Tools and Workers

# Dummy tools for our researchers
def graphql_search_tool(query: str):
    """A dummy tool that returns fixed info about GraphQL."""
    print(f"GRAPHQL RESEARCHER: Searching for '{query}'")
    return "GraphQL Pros: Efficient data fetching (no over-fetching), single endpoint, strongly typed schema."

def rest_search_tool(query: str):
    """A dummy tool that returns fixed info about REST."""
    print(f"REST RESEARCHER: Searching for '{query}'")
    return "REST API Cons: Can lead to over or under-fetching data, requires multiple round-trips for complex queries, URL-based structure can be rigid."

# Worker Nodes
def graphql_research_worker(state: PlannerState):
    """Worker node that researches GraphQL pros."""
    results = graphql_search_tool("pros of GraphQL")
    return {"graphql_results": results}

def rest_research_worker(state: PlannerState):
    """Worker node that researches REST cons."""
    results = rest_search_tool("cons of REST APIs")
    return {"rest_results": results}

def writer_worker(state: PlannerState):
    """
    Synthesizer node that waits for all research and writes the final output.
    This node acts as the "join" point.
    """
    print("WRITER: Synthesizing results")
    graphql_results = state['graphql_results']
    rest_results = state['rest_results']

    writing_prompt = f"""
    Write a short, balanced comparison post based on the following research.

    GraphQL Information:
    {graphql_results}

    REST API Information:
    {rest_results}
    """
    response = llm.invoke(writing_prompt)
    return {"final_output": response.content}

# Define the Planner
def planner(state: PlannerState):
    """Planner node that creates the initial plan."""
    print("PLANNER: Creating a plan for parallel execution")
    # For this example, the plan is hardcoded.
    # In a real app, an LLM would generate this based on the task.
    plan = [
        "Research GraphQL pros",
        "Research REST cons",
        "Write comparison post"
    ]
    return {"plan": plan}

# Build the Graph
workflow = StateGraph(PlannerState)

# Add the nodes
workflow.add_node("planner", planner)
workflow.add_node("graphql_researcher", graphql_research_worker)
workflow.add_node("rest_researcher", rest_research_worker)
workflow.add_node("writer", writer_worker)

# Set the entry point
workflow.set_entry_point("planner")

# Define the parallel edges
# After the planner, both research workers are called.
workflow.add_edge("planner", "graphql_researcher")
workflow.add_edge("planner", "rest_researcher")

# Define the join point
# The writer will only run after BOTH research workers are complete.
workflow.add_edge("graphql_researcher", "writer")
workflow.add_edge("rest_researcher", "writer")

# The graph ends after the writer is done
workflow.add_edge("writer", END)

# Compile the graph
graph = workflow.compile()Planning 워크플로우 차트:

그래프 이벤트를 스트리밍함으로써, 에이전트가 단계별로 어떻게 진행되는지 실행 흐름을 관찰할 수 있습니다. 최종 출력은 계획(Planning)이 어떻게 더 풍부하고 일관된 결과를 위해 구조화된, 다단계 추론을 가능하게 하는지 보여줍니다.
# Run the Graph
user_task = "GraphQL의 장점과 REST API의 단점을 비교하는 짧은 글을 작성하세요."
initial_state = {"task": user_task}

# Stream the events to see the execution flow
for event in graph.stream(initial_state):
    for key, value in event.items():
        print(f"Node '{key}' output:")
        print("---")
        print(value)
        print("\n" + "="*30 + "\n")

# Get the final output
final_state = graph.invoke(initial_state)
print("Final Comparison Post:")
print(final_state['final_output'])출력:
PLANNER: Creating a plan for parallel execution
Node 'planner' output:
---
{'plan': ['Research GraphQL pros', 'Research REST cons', 'Write comparison post']}

==============================

GRAPHQL RESEARCHER: Searching for 'pros of GraphQL'
Node 'graphql_researcher' output:
---
{'graphql_results': 'GraphQL Pros: Efficient data fetching (no over-fetching), single endpoint, strongly typed schema.'}

==============================

REST RESEARCHER: Searching for 'cons of REST APIs'
Node 'rest_researcher' output:
---
{'rest_results': 'REST API Cons: Can lead to over or under-fetching data, requires multiple round-trips for complex queries, URL-based structure can be rigid.'}

==============================

WRITER: Synthesizing results
Node 'writer' output:
---
{'final_output': 'Here’s a quick, balanced snapshot based on the notes you provided.\n\nGraphQL\n- Pros: Efficient data fetching (no over-fetching), single endpoint, strongly typed schema.\n- What this means: Clients can request exactly what they need from one place, and tooling can rely on a defined schema for better validation and discovery.\n\nREST API\n- Cons: Can lead to over or under-fetching data, requires multiple round-trips for complex queries, URL-based structure can be rigid.\n- What this means: Simpler, well-understood patterns and caching can be advantageous, but complex queries may require multiple calls and careful handling to avoid inefficient data transfer.\n\nBalanced take\n- GraphQL advantages come with added server complexity: setting up resolvers, managing query cost, and caching can be more challenging.\n- REST advantages include straightforward caching, simpler mental model, and broad ecosystem support, but you may end up fetching more or less data than needed and making extra requests for complex views.\n\nBottom line\n- Use GraphQL when your frontend needs flexible, nested data and a single entry point, and you’re prepared to invest in schema and resolver tooling.\n- Use REST for simpler, stable resources where caching and a conventional resource model fit well.\n- Many teams blend approaches: REST for stable resources and GraphQL for parts of the app with complex or evolving data needs.'}

==============================

PLANNER: Creating a plan for parallel execution
GRAPHQL RESEARCHER: Searching for 'pros of GraphQL'
REST RESEARCHER: Searching for 'cons of REST APIs'
WRITER: Synthesizing results
Final Comparison Post:
Short, balanced comparison

- GraphQL
  - Pros: Efficient data fetching (no over-fetching), single endpoint, strongly typed schema.

- REST API
  - Cons: Can lead to over or under-fetching data, requires multiple round-trips for complex queries, URL-based structure can be rigid.

Bottom line: GraphQL offers a single, strongly typed interface that can fetch exactly what you need efficiently. REST remains simple and widely understood, but may incur data inefficiencies and a less flexible URL-based structure for complex queries.
Multi-Agent Collaboration
마지막으로 소개할 패턴은 Multi-Agent Collaboration입니다.
이 패턴은 여러 에이전트를 하나의 팀처럼 조직화하여, 각기 다른 역할을 수행하도록 조정하는 오케스트레이션(Orchestration) 구조를 구현합니다.
이 구조에서는 다음과 같은 방식으로 협업이 이루어집니다.
- Supervisor(감독자) 노드가 요청을 분석하고, 어떤 에이전트가 처리할지 결정
- 전문가(Specialist) 에이전트가 자신의 영역(예: 날씨, 항공편 등)을 처리
- 결과를 Supervisor에게 다시 전달하여, 전체 워크플로우로 피드백
LangGraph는 Command 객체를 활용해 이러한 흐름을 동적으로 라우팅합니다.
이를 통해 각 에이전트는 상태를 업데이트하고, 다음 단계의 행동을 스스로 결정할 수 있습니다.
이 아키텍처는 인간 팀이 협업하는 방식과 유사합니다.
즉, 각 구성원이 자신의 전문 분야에 집중하면서도, 공통 목표 아래에서 조정·통합되는 구조입니다.다중 에이전트 협업은 설계 난이도가 높지만, 그만큼 확장성, 모듈성, 성능 향상 측면에서 큰 장점을 제공합니다.
LangGraph를 활용하면 이러한 복잡한 협업 시스템을 시각적이고 명확한 그래프 형태로 구현할 수 있습니다.
# Set up the Language Model
llm = ChatOpenAI(
model="gpt-5-nano",
api_key=OPENAI_API_KEY
)
# Define the Supervisor's Routing Logic
# This Pydantic model helps the supervisor choose the next agent.
class Router(BaseModel):
"""Decide the next agent to route to."""
next_agent: Literal["Weather", "Flights", "__end__"]
# Bind the router to the model to get structured output.
supervisor_model = llm.with_structured_output(Router)
def supervisor(state: MessagesState) -> Command:
"""
The central supervisor that routes to the correct agent or ends the conversation.
"""
print("--- 🧑💼 SUPERVISOR ---")
# The prompt tells the supervisor how to route the user's message.
prompt = f"""You are a supervisor routing tasks to a specialist agent.
Based on the user's request, choose the appropriate agent.
Available agents:
- Weather: For questions about weather forecasts.
- Flights: For questions about flight information.
If the user is saying thank you or the conversation is over, choose '__end__'.
User message: "{state['messages'][-1].content}"
"""
if isinstance(state['messages'][-1], HumanMessage):
# The supervisor model makes the routing decision.
response = supervisor_model.invoke(prompt)
print(f"Supervisor routing to: {response.next_agent}")
return Command(goto=response.next_agent)
else:
return Command(goto='__end__')
# Define the Specialist Agents
def weather_agent(state: MessagesState) -> Command:
"""A specialist agent for handling weather-related queries."""
print("--- ☀️ WEATHER AGENT ---")
prompt = f"""You are a weather forecaster. Provide a concise mock weather forecast
for the location mentioned in the user's message.
User message: "{state['messages'][-1].content}"
"""
response = llm.invoke(prompt)
print(f"Response: {response.content}")
# Return to the supervisor after the agent has run.
return Command(
goto="supervisor",
update={"messages": [response]},
)
def flights_agent(state: MessagesState) -> Command:
"""A specialist agent for handling flight-related queries."""
print("--- ✈️ FLIGHTS AGENT ---")
prompt = f"""You are a flight information assistant. Provide some mock flight
details for the destination in the user's message. Respond with short concise information.
User message: "{state['messages'][-1].content}"
"""
response = llm.invoke(prompt)
print(f"Response: {response.content}")
# Return to the supervisor after the agent has run.
return Command(
goto="supervisor",
update={"messages": [response]},
)
# Build the Graph
builder = StateGraph(MessagesState)
# Add the supervisor and agents as nodes in the graph.
builder.add_node("supervisor", supervisor)
builder.add_node("Weather", weather_agent)
builder.add_node("Flights", flights_agent)
# The START node directs the flow to the supervisor first.
builder.add_edge(START, "supervisor")
# The graph is now complete. The `Command` objects will handle the dynamic routing.
graph = builder.compile()
다중 에이전트 협업 패턴이 실제로 작동하는 것을 보려면, 대화형 세션(interactive session)을 실행할 수 있습니다. 사용자가 메시지를 입력하면, 슈퍼바이저가 이를 적절한 전문가 에이전트에게 동적으로 라우팅합니다.
graph.stream() 메서드를 사용하면 실시간으로 응답을 스트리밍할 수 있으므로, 슈퍼바이저와 에이전트가 어떻게 상호작용하고, 요청을 처리하며, 결과를 원활하게 반환하는지 관찰할 수 있습니다.
while True:
    user_input = input("User: ")
    if user_input.lower() in ["quit", "exit", "q"]:
        print("Goodbye!")
        break

    # The graph.stream() method invokes the graph and streams the results.
    events = graph.stream({"messages":[HumanMessage(content=user_input)]})
    for event in events:
        # We only print the AI's responses to the user.
        if "messages" in event:
event["messages"][-1].pretty_print()출력:
--- 🧑💼 SUPERVISOR ---
Supervisor routing to: Weather
--- ☀️ WEATHER AGENT ---
Response: 다음은 LA의 모의(가상) 날씨 예보입니다. 실제 정보가 아닙니다.
- 오늘: 맑고 화창. 최고 26°C, 최저 15°C. 바람 5-15 km/h 남서풍. 강수 확률 0%.
- 내일: 대체로 맑음. 최고 27°C, 최저 16°C. 바람 10-20 km/h 남동풍. 강수 확률 0%.
- 주말: 토요일 맑은 날씨, 25-28°C, 강수 확률 0-5%. 일요일 흐림, 24-26°C, 바람 약간.
--- 🧑💼 SUPERVISOR ---
--- 🧑💼 SUPERVISOR ---
Supervisor routing to: Flights
--- ✈️ FLIGHTS AGENT ---
Response: 다음은 오늘 서울(ICN)에서 LA(LAX)로 가는 모의 비행 일정 예시입니다. 실제 일정과 다를 수 있습니다.
- KE701 Korean Air, ICN 12:00 KST → LAX 07:00 PDT, 약 11시간, Boeing 777-300ER, 예시
- OZ203 Asiana, ICN 14:30 KST → LAX 09:30 PDT, 약 11시간, Airbus A350-900, 예시
- DL611 Delta, ICN 17:15 KST → LAX 12:15 PDT, 약 11시간, Boeing 787-9, 예시
- KE707 Korean Air, ICN 23:50 KST → LAX 18:50 PDT, 약 11시간, Boeing 777-300ER, 예시
실제 일정은 항공사 홈페이지나 예약 시스템에서 확인해 주세요.
--- 🧑💼 SUPERVISOR ---
--- 🧑💼 SUPERVISOR ---
Supervisor routing to: __end__
마무리
LangGraph는 단순히 에이전트를 연결하는 프레임워크가 아닙니다. AI 시스템을 설계하는 사고방식 자체를 구조화하는 도구입니다.
프롬프트 체이닝으로 정보 흐름을 명확히 하고, 라우팅과 Parallelization 처리로 효율적인 분기와 실행을 구현하며, Reflection 패턴으로 품질을 지속적으로 개선할 수 있습니다.
여기에 도구 사용, Planning , Multi-Agent Collaboration 까지 결합하면 단일 모델이 감당하기 어려운 복잡한 작업도 체계적이고 확장 가능한 방식으로 해결할 수 있습니다.
결국 중요한 것은 기술보다 패턴을 이해하고 적용하는 능력입니다. LangGraph는 그 패턴을 시각적이고 직관적으로 표현함으로써, AI 에이전트를 단순한 프로토타입 수준이 아닌 프로덕션급 시스템으로 발전시키는 기반을 제공합니다.
'AI' 카테고리의 다른 글
| RAG #2 - Chunking (0) | 2025.12.28 |
|---|---|
| RAG #1 (0) | 2025.12.28 |
| Google file search (0) | 2025.11.18 |
| Agile is Out, Architecture is Back (0) | 2025.11.09 |
| AI Agent vs Agentic AI (3) | 2025.07.27 |